The best approach for serving models depends on your deployment environment and expected workload. Typically, you are constrained to a specific cloud platform when working at a company, because your model service may need to interface with other components in the cloud, such as a database or cloud storage. Within AWS, there are multiple options for hosting containers while GCP is aligned with GKE as a single solution. The main question to ask is whether it is more cost-effective to serve your model using serverless function technologies or elastic container technologies.
The correct answer depends on the volume of traffic you need to handle, the amount of latency that is tolerable for end-users, and the complexity of models that you need to host. Containerized solutions are great for serving complex models and making sure that you can meet latency requirements, but they may require a bit more DevOps overhead versus serverless functions.
Container orchestration systems are responsible for managing the life cycles of containers in a cluster. They provide services including provisioning, scaling, failover, load balancing, and service discovery between containers.
the general trend has been moving towards Kubernetes for this functionality, which is an open-source platform originally designed by Google.
FROM command to identify a base image to use. The ubuntu image provides a Linux environment that supports the apt-get command. MAINTAINER command adds to the metadata information associated with the image, adding the name of the image maintainer. * The RUN command is used to install Python, set up a symbolic link, and install Flask. For containers with many Python libraries, it’s also possible to use a requirements.txt file. COPY and ADD command inserts our script into the image and places the files and folders in the root directory. RUN, CMD, or ENTRYPOINT, which specifies which arguments to run to execute the application. Read more heredos
FROM ubuntu:latest
MAINTAINER Linh H
RUN apt-get update \
&& apt-get install -y python3.9 python3-pip \
&& cd /usr/local/bin \
&& ln -s /usr/bin/python3 python \
&& pip3 install flask==2.0 pandas==1.4 mlflow==2.1 scikit-learn==1.0.2 statsmodels==0.13.2
COPY echo_docker.py echo.py
ADD models models
ADD db db
ENTRYPOINT ["gunicorn","echo:app", "-b", "0.0.0.0:80"]Let's build an image, named echo_service, for the current folder. You need Docker daemon services running background.
$ docker image build -t "echo_service" .After successfully building the image, we can start running this image as a container to serve the predictive model at port 8080.
$ sudo docker run -d -p 8080:80 echo_serviceFiles of Demo Codes are located in the demo-code\echo_service folder.
Now we want to deploy the image onto GCP using the Kubernetes service. The first step is to save your image to a Docker registry that can interface with the orchestration system. The GCP version of this registry service is called Container Registry.
Make sure we turn on the Google Container Registry API and Kubernetes Engine API by enabling them in the GCP console.
We need the GCP credentials JSON file that we set up in the Step 1 Chapter. Then we log in GCP Container Registry at https://us.gcr.io .
$ cat newacc_gcp_credential.json | sudo docker login -u _json_key --password-stdin https://us.gcr.io
$ sudo docker tag echo_service us.gcr.io/scalable-model-piplines/echo_service
$ sudo docker push us.gcr.io/scalable-model-piplines/echo_service
Log in on Windows OS:
$ type newacc_gcp_credential.json | docker login -u _json_key --password-stdin https://us.gcr.ioOn the Google Kubernetes Engine main page:
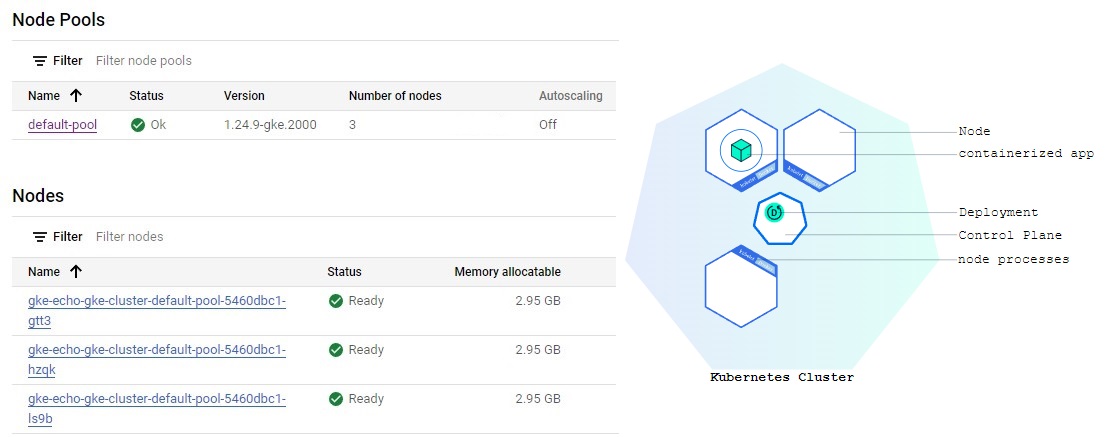
When GKE ran the Docker image, it started a cluster and we can set up Services which are sets of Pods with a network endpoint that can be used for discovery and load balancing.
In Workloads menu> select echo-gke > menu ACTION > run EXPOSE to expose the cluster to external traffic.
Now we choose Load balancer for Service type which maps to port 80 to our gunicorn server.
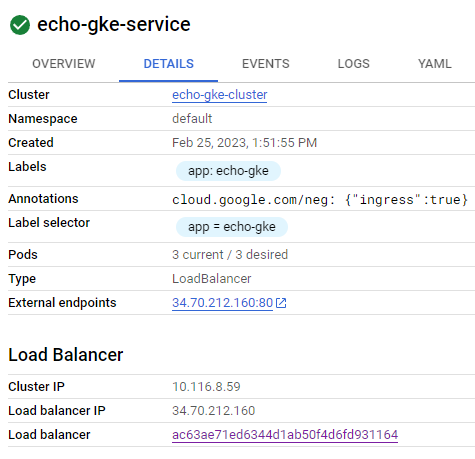
By calling http://34.70.212.160/predict?range=1 it will return JSON result of predictions.
import requests

result = requests.get("http://34.70.212.160/predict?range=1")
print(result.json())
autoscale¶For the Kubernetes cluster, we can use kubectl to make our cluster automatically scale up when a condition is met. For the example below, when all CPU utilization is up to 80%, the cluster is adding more nodes until it reaches --max=5 nodes.
kubectl autoscale deployment echo-gke --cpu-percent=80 --min=2 --max=5In GKE, there is an option to turn on the autoscale
Go to GKE UI, select Workloads on the left menu
Select the deployment of the workloads, in this case, it is prediction
On top menu, click ACTIONS and choose Autoscale


Traffic-based autoscaling: Besides pod autoscaling, we also can scale up the system based on traffic utilization signals. Traffic-based autoscaling is enabled by the Gateway controller.
In this example, I put trained models inside the container. In the next chapter, we can put these trained models on external storage (i.e. Google Cloud Storage). Whenever the predictor is called, it loads the trained model and runs the prediction.
Hence, we only need to set up a Container once and focus on developing model pipelines.
Batch model pipelines automatically perform a sequence of tasks in order to train and store results for a Machine Learning model. In a batch process, we perform a set of operations that store trained models and predictions that are later served by different applications.
However, when working with the pipelines, any issues should be resolved quickly. Because there are many tasks and components involved in a pipeline, issues can occur at any part of the system. Hence, we need a system in place that can send alerts to the team that owns the pipeline and rerun portions of the model pipeline to resolve any issues.
Workflow tools provide a solution for managing these types of problems in model pipelines and are responsible for:
There are several open-source tools for building workflows including Airflow, Luigi, MLflow, and Pentaho Kettle. We focus on Apache Airflow, which Google Cloud Composer is built on it, in this project.
There are typically two types of batch model pipelines:
There are a few situations where workflow tools provide benefits over using cron directly:
Workflow tools: One of the key benefits is the ability to handle DAG configuration as code, which enables code reviews and version control for workflows.
Google Cloud Dataflow provides a useful framework for scaling up sklearn models to massive datasets. Instead of fitting all the input data into a data frame, we can score each record individually in the process function and use Apache Beam to stream these outputs to a data sink, such as BigQuery.
There are a lot of examples/tutorials for TensorFlow work in Cloud Dataflow for batch predictions here.
The core component in Dataflow is a pipeline that defines the operations to perform as part of a workflow:
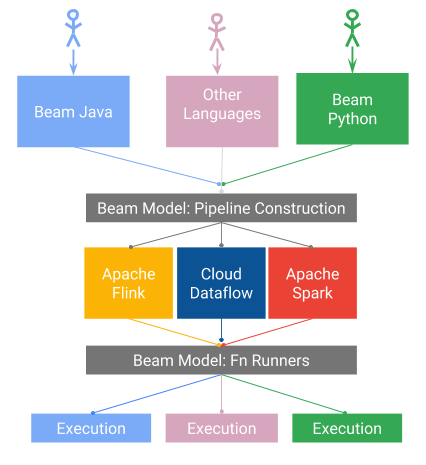
each element in a collection, resulting in a new collection.sets of elements in a collection, such as aggregation.Cloud Dataflow builds upon the open-source Apache Beam library, making it usable in other cloud environments. One of the main reasons for using Beam is the ability to switch between multiple runners such as Apache Spark, Apache Flink, Samza, and Google Cloud Dataflow because Apache Beam looks like a framework.
Many organizations are now using streaming platforms in order to build real-time data pipelines that transform streams of data and move data between different components in a cloud environment. These platforms are typically distributed and provide fault tolerance for streaming data.
To connect different systems, we can use Kafka for a self-host solution or cloud services such as Google Pub/Sub or Amazon Kinesis.
Passive prediction (like log or update): when the user made an action (watch, view, play, buy, sell an item), we can update the recommendation list for that user for the next serving. The predictions are saved to a database or data store.
Active prediction: A client asks for a prediction and sends a request to modeling, the result might not need right away (pre-generating prediction in the background). But the results are sent back to the client and are not probably saved to a database.
Although the Active prediction sounds like Lambda or Cloud Function, there are keys different when using Cloud Dataflow:
It is easy to connect with other components in cloud platforms. We can push data to BigQuery for storage or forward output to another message consumer.
Able to use distributed tools, such as PySpark, in contrast to the endpoint-based approaches that service requests in isolation.
More tools and different programming languages supported.
Unlike Kafka, PubSub uses separate concepts for producer and consumer data sources. In Kafka, you can publish and subscribe to a topic directly, while in PubSub consumers subscribe to subscriptions rather than directly subscribing to topics. With PubSub, you first set up a topic and then create one or more subscriptions that listen to this topic.
In PubSub UI in the GCP Console, let's create a topic ID sale-range
In this topic, we create a Subscription ID predict-range. There are three Delivery types:
Pull: your subscriber client initiates requests to a Pub/Sub server to retrieve messages.
Push: a Pub/Sub server initiates a request to your subscriber client to deliver messages.
Write to BigQuery: A BigQuery subscription writes messages to an existing BigQuery table as they are received. You need not configure a separate subscriber client.
For pull, the subscribers must request delivery. For other subscription types, Pub/Sub delivers messages as soon as they are published.
from google.cloud import pubsub_v1

subscriber = pubsub_v1.SubscriberClient()
subscription_path = subscriber.subscription_path(
    "google_project_name", "Subscription_ID"
)

def callback(message):
    print(message.data)
    message.ack()

subscriber.subscribe(subscription_path, callback=callback)
from google.cloud import pubsub_v1

publisher = pubsub_v1.PublisherClient()
topic_path = publisher.topic_path("google_project_name", "Topic_ID")

data = "Hello World!".encode('utf-8')
publisher.publish(topic_path, data=data)
We need to encode the message in utf-8 format before publishing the message.